
Here's what's being released right now:
Pumpkin Box Template
All of the templates come in a zip file that includes several formats: PDF for traditional scissors cutting, and all of the popular electronic cutter files.
All of the templates come in a zip file that includes several formats: PDF for traditional scissors cutting, and all of the popular electronic cutter files.
I am so thrilled to have three of my designs in that list and I hope you'll be as excited about them as I am. So, you wanna know what I've got for you? Well, I just happen to have a Halloween themed birdhouse. I just LOVE how this turned out! There are lots of pictures, but I wanted to give you a tutorial on how to put this cutie together. First, though, let me show you my house. I've used some older MFT sets and lots of dies to decorate it.
Here's the front view using Wendy Alphabet, Too Cute To Spook, Trick or Treat With Who's That Girl, and Banner Day, Sheltering Tree Leaf Trio, and Fresh Cut Grass Die-namics dies.

***********

**********
Here I'm using Sheltering Tree leaf dies and images from Totally Witchin' and Fred Bear Goes Camping (see the fire under the kettle?)

**********
And here, Flopsey makes a cameo appearance (I couldn't resist--you know I love me some Flopsey!)

**********
And look--the top comes off and is a treat or gift box. You can put the "door" at the bottom if you wish--or not at all, or draw one--it's totally up to your imagination!
**********
First of all, cut out all the pieces, either using the Print and Cut version or whatever cut file your electronic cutter uses. For this house, I used my Silhouette, so no score lines were indicated. If you use an electronic cutter version, you need the Print and Cut version to show you where the score lines need to go.

**********
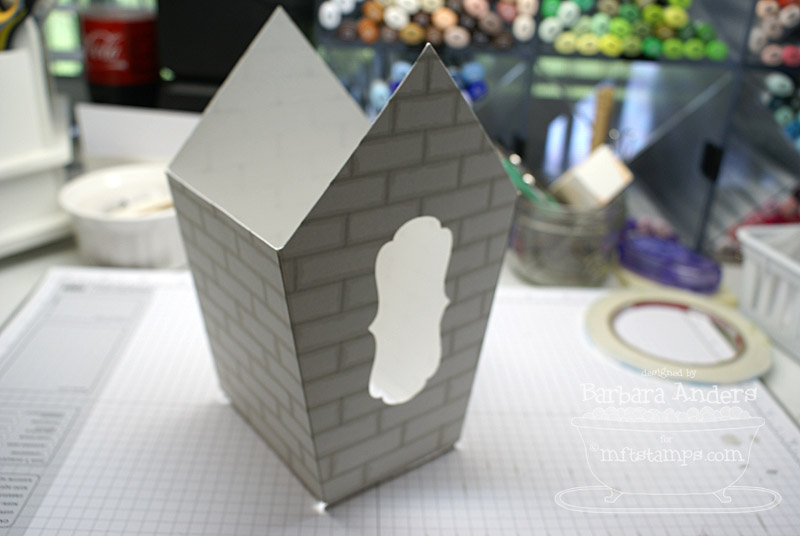
I wanted my walls to look like a creepy old stone house, so I used some light gray card stock and drew in the stone blocks with a Copic marker--W3. Then I went back over the lines with W1 to blur them a bit. You can use patterned paper, too, but make sure it's sturdy enough to support the roof.

**********
Next you'll want to score, fold, and apply a really strong adhesive (such as Scor-Tape or Red Line tape) to the flaps on the front and the back pieces.

**********
And then attach the side pieces like this:
**********
Next, you'll want to attach the base. I used a piece of card stock here, but you might want to use a piece of lightweight chipboard covered with card stock for more stability. Just add adhesive to the bottoms flaps, center it over the base, and stick it down. I didn't want to overwhelm you with too many pictures, so I'll just tell you that I cut another piece of my base card stock to fit the inside--it covers up those flaps and just makes it look neater.

**********
OK, on to the roof. Score where indicated and then "fit" it to the house. The easiest way is to put a bit of adhesive on the little flap area, then put it on the house to get the correct "pitch". After you do that, add some extra adhesive to reinforce it.

*********

**********
The next step is putting shingles on the roof :) I used my Jumbo Scallope Die-namics die to cut my "shingles". For the ridge pole section, you need to die cut on both sides and score it down the center, long way.

**********
And attach it like this. I found it to be easier to start at the top and work down to the eaves, rather than the other way around.

**********
Then add more runs of shingles--these only need to be die cut on one side, but you'll need to cut them so the "fish scales" are staggered, like this:

**********
Next you'll need to cut your "boxing". I used my Scalloped Scallop Die-namics die for this.

**********
Trim the boxing strips to fit up under your shingle edges and covering the folded down edges of your roof base and adhere. As a finishing touch, I sponged some green Distress ink here and there to simulate moss :)

**********
Thanks so much for stopping by!
~Supplies~
Stamps: Wendy Alphabet, Totally Witching, Fred Bear Goes Camping, Who's That Ghost and Ghoulish Labels (both out of stock), too Cute To Spook, Trick or Treat With Who's That Girl (MFT)
Paper: Fossil, Whip Cream, Orange Fizz, Hot Fudge, and Black Licorice card stock (MFT); Soft Stone (PTI); Eerie 6 x 6 pad (Basic Grey)
Ink: Memento Tuxedo Black; Crushed Olive Distress Ink (Ranger)
Accessories/tools: Cuttlebug (Provocraft); Banner Day, Sheltering Tree Leaf Trio, and Fresh Cut Grass, Jumbo Scallop, Scalloped Scallop Die-namics dies; spider web, branch, bat punches (Martha Stewart); buttons, twine (PTI); Copic markers; jewels (craft store); Scor-Tape

Oh Barb this is a MASTERPIECE!!
ReplyDeleteWOW...GREAT Work! The house is Amazing! Thank you for showing how you made it!!!! WOW WOW WOW
ReplyDeleteLove it!
Janine
awesome Barb
ReplyDeleteWow Barbara !!! That is one amazing little treat house creation .... Oh My Goodness I just keep staring at it & wishing I could come up with something that wonderful... Your tutorial is very easy to figure out & all the work that went into "building" it is incredible ... LOVE it !!!
ReplyDeleteHugs, Janie
Oh Barbara this is SPOOKTACULAR!!! I love it all~~ the bricks are fantastic ....... the leaves on the roof and Flopsey ..... so cute!!! This is truly amazing Bar!!!
ReplyDeleteOMG! Totally amazing! I'm picking my jaw up as I type this. I just keep looking at the photos for all the amazing details you've included. Thanks for taking the time to share photos and instructions on the construction.
ReplyDeleteThis is amazing! What I can't get over is how you so creatively incorporated SO MANY of the MFT dies! you're brilliant. This is a supah dupah project! I love it! Are those all your Copics in that back of that pic?! Holy, Gal! It looks like a Copic Warehouse! I'm just jealous! :)
ReplyDeleteLook. At. All. Those. Copics. WHOA.
ReplyDeleteI'm super impressed by your Copics, but that bird house is a stunner!
ahhhhh! gorgeous creation, been dying to tell you so! Can't wait to make one of my own! great work!
ReplyDeleteGirlfriend, this is just FABULOUS!!! I love it! You really outdid yourself on this super-special creation!
ReplyDeleteThis is absolutely awesome Barb! Love every single detail!
ReplyDeleteTotally AMAZING!! I can't believe you used all of those stamps and Die-namics! You rock!!
ReplyDeleteI think Cindy said it best : It's A Masterpiece!!!! Hands down I think this is the best creation I have ever seen!! You have so many details and that makes it PERFECT! I Love details and even though I don't celebrate Halloween, this is Awesome!!I think you might have single handedly convinced me to buy this and try to make a Christmas gingerbread house! :)
ReplyDeleteYou know that I just love your cute, sweet birdhouse!! So many fun details! I can't wait to have time to play with the template.
ReplyDeleteThis is unbelievably creative. I can't believe all the elements you put into it. I appreciate the step by step pics and I loved catching a peek of your copic storage unit and all those beautiful copic colors in the background.
ReplyDeleteOh my Barb this is fantastic! What a wonderful project! Just wow!
ReplyDeleteso awesome...i love this!!
ReplyDeleteShut up...this is over the top cute and oh so fabulous!!! Love your idea and tutorial!!! TFS ~S~
ReplyDeleteThis is SO incredibly cute, Barbara! And I'm so proud of you, coming up with these templates! They're ALL awesome!
ReplyDeleteWow....you did a fabulous job. The house is amazing. I always love your projects for MFT.
ReplyDeleteBar this is fabulous! Seriously jaw dropping with all your details! I love this template along with the others you created as well!
ReplyDeleteThis is so fabulous, Bar! LOVE all the little details, and especially Flopsey on the back, perfectly placed! Congrats on some awesome new templates!
ReplyDeleteWOWWWWWWWWWWWWWWZERS!! I'm with Cindy. It's a MASTERPIECE!
ReplyDeletewow, how creative you are! Just love the house!
ReplyDeleteReally wonderful and spooky project. I love it, and look forward to creating it next Halloween. Love the translucency of the walls.
ReplyDelete