Thursday, February 28, 2019

For the Birthday Girl–MFT Color Challenge #112


Hi, all, I'm back with the latest MFT Color Challenge! Are you ready? Here’s this week’s color combo: Tropical Teal, Wild Wisteria, Primitive Cream, and Sour Apple. All of the details about the color challenge are available on the MFT Challenge & Inspiration blog as well as in the weekly newsletter. The MFT Design Team will be on hand to provide plenty of inspiration to get you started.


OK, I just have to pat myself on the back for coloring this ethnic image. It’s my first one and I’ve always avoiding them because I was afraid—afraid I couldn’t do a decent job. Not only did I do it but I’m really pleased with it:) The image is PI For the Birthday Girl with coordinating Die-namics and I’m also using Tag Builder Blueprints 7 Die-namics for the shaker element. Since there’s no white on this card otherwise, I colored the white in the Plaid Patterns paper pack with Copic marker YR03 and also around the edges of the die cut and the background of her skirt


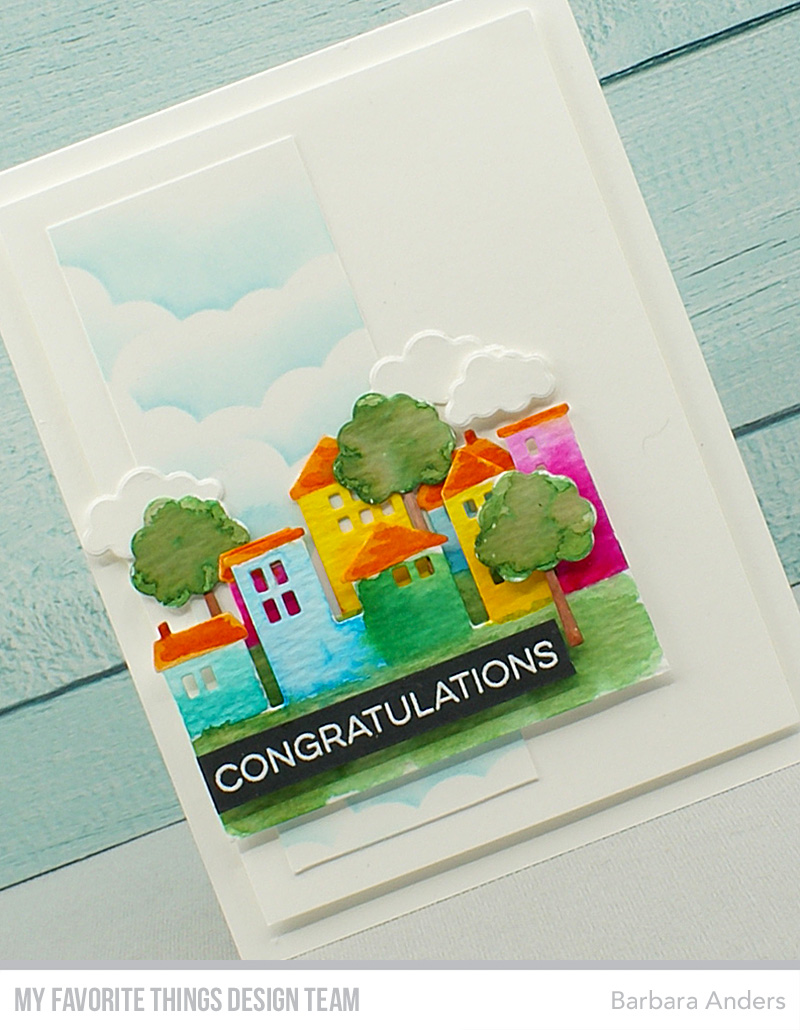
I used foam tape for dimension and the sentiment was heat embossed on Tropical Teal card stock cut with the banner from Tag Builder Blueprints 7.

And that’s it! Remember, you can get all the details by visiting the MFT Challenge Blog. You have the chance to win a $50 in MFT voucher. One winner is chosen at random each week!

Thanks for stopping by! See you soon!


All products from
My Favorite Things unless otherwise noted.

Stamps: PI For the Birthday Girl
Die-namics: PI For the Birthday Girl, Tag Builder Blueprints 7
Hybrid Ink: Extreme Black
Patterned Paper: Plaid Patterns
MFT Card Stock: Primitive Cream, Tropical Teal, No Line Coloring
Supplies: foam mounting tape, Circle Shaker Pouches, 1/8” Scor-Tape
Tools: Smart Grid Paper Pad, Mini MISTI, Mini MISTI Grid Paper Pad, MISTI Bar Magnets, Square Bone Folder, Scor-Buddy, craft tweezers

Other: Die-cutting machine, paper cutter, Copic markers,  tape runner, white detail embossing powder, Multi Medium Matte Glue, QuickStik Pick-up Tool, Precision Tip Glue Applicator Bottle, Embossing Magic, Sakura White Gelly Roll Pen, plastic eraser, heat tool, enamel dots


Wednesday, February 27, 2019

Sending Rainbows and Hearts–MFT Wednesday Sketch Challenge #426


Hi, everyone, I’m back with this week’s MFT Wednesday Sketch Challenge! Are you ready? Here’s this week’s sketch. All of the details about the sketch challenge are available on the MFT Challenge & Inspiration blog as well as in the weekly newsletter. The MFT Design Team will be on hand to provide plenty of inspiration to get you started.


I always try to come up with a different take and still maintain the integrity of the sketch so I started looking at my Die-namics to see what I could use that would fill the bill and I came up with this card. I started by doing the background with Mini Cloud Edges Stencil and Blue Breeze dye ink. The diagonal element was done with Stitched Cloud Edges Die-namics with a sentiment from Rainbows & Unicorns stamped with Black Licorice dye ink and Sunny Skies Die-namics cut from Lemon Drop card stock tucked behind, and added another cloud layer popped up on foam tape.


Then I cut Stitched Rainbow Die-namics from Sweet Tooth card stock and colored each section with a Copic marker and popped it up on foam with a Puffy Cloud. In keeping with the theme of the sentiment, I added a tiny heart to each color, cut Tag Builder Blueprints 6.

And there you have it! Remember, you can get all the details by visiting the MFT Challenge Blog. You have the chance to win a $50 in MFT voucher. One winner is chosen at random each week!

Thanks for stopping by! See you soon!


All products from My Favorite Things unless otherwise noted.

Stamps: Rainbows & Unicorns
Die-namics: Stitched Cloud Edges, Stitched Rainbow, Sunny Skies, Tag Builder Blueprints 6, Puffy Clouds
Stencils: Mini Cloud Edges
Dye Ink: Blue Breeze, Black Licorice
MFT Card Stock: Sweet Tooth, Lemon Drop, Red Hot, Orange Zest, Lemon Drop, Sour Apple, Blu Raspberry, Grape Jelly
Supplies: foam mounting tape
Tools: Smart Grid Paper Pad, Mini MISTI, Mini MISTI Grid Paper Pad, MISTI Bar Magnets, Square Bone Folder, Scor-Buddy, craft tweezers

Other: Die-cutting machine, paper cutter, Copic markers, tape runner, Multi Medium Matte Glue, QuickStik Pick-up Tool, Precision Tip Glue Applicator Bottle, sponge daubers, plastic eraser


To My Favorite Party Animal–Color Throwdown Challenge #532


Hello and welcome to a new
Color Throwdown Challenge! I’m hosting this week and I’ve chosen a varied palette based on this gorgeous photo of Ireland—somewhere I’d love to go someday. I hope to see lots of you playing along with us this week!


My card uses the just-released Birthday Bear & Friends Stamp Set and Die-namics from
MFT. The images are all stamped on No Line Coloring card stock with Extreme Black hybrid ink, cut with the coordinating Die-namics, and colored with Copic markers. The background was done by applying a watercolor wash on Ranger Watercolor paper using Peerless Watercolors. I added Grassy Fields Die-namics cut from Sour Apple card stock and framed everything with Sweet Tooth card stock cut with Inside & Out Stitched Oval STAX Die-namics.


Once the frame was in place I added the images and Puffy Clouds Die-namics, then added everything to a Sweet Tooth card stock base. The sentiment was heat embossed on Black Licorice card stock cut with Essential Fishtail Sentiment Strips, also popped up on foam.

And that’s it from me! Remember, you do not have to have the exact colors to play the Color Throwdown challenge. If you don't, just use the closest you have. So, c'mon over to the Color Throwdown blog and play along with us this week. Please use the link service to post your card and please link directly to your card so we can find it easily. And please include a link in your post to the Color Throwdown. If you upload your card to a public forum, please use the keyword CTD532 so we can see your beauty all in one place, and use #ctd532 and #colorthrowdown on social media. Hope to see you there! Be sure to check out what the other team members have come up with this week, along with our super talented Guest Designer, Leigh O’Brien!

Amy Rohl
Amy Rysavy
Barbara Anders
(<—You are here!)
Broni Holcombe
Jodi Collins
Lisa Henke
Lori Tecler
Lynn Put
Vickie Zimmer
Wanda Cullen
Leigh O’Brien – February Guest Designer

Thanks so much for stopping by today! See you soon!


All products from My Favorite Things unless otherwise noted.

Stamps: Birthday Bear & Friends
Die-namics: Birthday Bear & Friends, Inside & Out Stitched Oval STAX, Puffy Clouds, Essential Fishtail Sentiment Strips, Grassy Fields
Hybrid Ink: Extreme Black
MFT Card Stock: Sweet Tooth, Sour Apple, Black Licorice, No Line Coloring
Supplies: foam mounting tape
Tools: Smart Grid Paper Pad, Mini MISTI, Mini MISTI Grid Paper Pad, MISTI Bar Magnets, Square Bone Folder, Scor-Buddy, craft tweezers

Other: Die-cutting machine, paper cutter, Copic markers, Ranger Watercolor paper, tape runner, white detail embossing powder, Multi Medium Matte Glue, QuickStik Pick-up Tool, Precision Tip Glue Applicator Bottle, Embossing Magic, Sakura White Gelly Roll Pen, Mini Mister, water brush, Peerless Watercolors, plastic eraser


Tuesday, February 26, 2019

The Party Has Arrived–MFT February Hits & Highlights


Tic Tac Toe is a classic game — what better way to insert some fun into your paper crafting projects than with a classic? Our exclusive Tic Tac Toe shapes can be used in SO many ways — everything from treats to tags to cards. This month, we are challenged to use the Tic Tac Toe acrylic shapes without using the Tic Tac Toe Die-namics or X's and O's stamp set. Yep, reach into your creative hat and pull a new trick out of your hat. You can pair the Tic Tac Toe with any other stamp set or die we offer. In fact, we encourage it. Ready? Set. Get crafty and have fun.


What a great challenge! I decided to use Party Penguins Stamp Set and Die-namics for my Tic Tac Toe board. I started by stamping and cutting out all the images and adding a little highlighting to the penguins and sprinkles on the cupcakes. Next I added a strip of Sweet Celebration Paper Pack across the bottom of a Sweet Tooth card stock card base, then I cut the Sweet Tooth card stock card front with Square Shaker Window & Frame Die-namics.


I stamped both sentiments and finished the shaker element with Tic Tac Toe – White and the cupcakes and party hats and added the frame. The only thing left was to add all the stamped images, popped up on foam for dimension.

And there you have it for MFT’s February Hits & Highlights feature. Thanks so much for stopping by today—see you soon!


All products from My Favorite Things unless otherwise noted.

Stamps: Party Penguins
Die-namics: Party Penguins, Square Shaker Window & Frame
Dye Ink: Blu Raspberry, Tickled Pink, Sour Apple, Orange Zest, Black Licorice, Kraft
Patterned Paper: Sweet Celebration
MFT Card Stock: Sweet Tooth
Supplies: foam mounting tape, Square Shaker Pouches, Tic Tac Toe - White
Tools: Smart Grid Paper Pad, Mini MISTI, Mini MISTI Grid Paper Pad, MISTI Bar Magnets, Square Bone Folder, Scor-Buddy, craft tweezers

Other: Die-cutting machine, paper cutter, Copic markers, tape runner,  Multi Medium Matte Glue, QuickStik Pick-up Tool, Precision Tip Glue Applicator Bottle, Sakura White Gelly Roll Pen, plastic eraser


Sunday, February 24, 2019

Card Set Using Lots o’ Luck Collection from Doodlebug Design

Hello, I’m back today with some cards using the Lots o’ Luck Collection from Doodlebug Design. It definitely has a St. Patrick’s Day vibe but there’s so much more that you can do with it.


For my first card I started by adhering a strip of paper from the Bonnie Lass Double sided paper in the 6 x 6 paper pad across the bottom of a white card stock base with Tuxedo Strip washi tape and then adhered the card front with foam tape. I added more strips of Bonnie Lass paper and several pieces from the Lots o’ Luck Odds & Ends collection to create a little scene. This little leprechaun is adorable, don’t you think?


Next up a birthday card. First I sponged some aqua ink on my card front and adhered it with foam tape to the card base. At the bottom I used Some Rainbow’s End Double-Sided paper from the 6 x 6 paper pad and a strip of 12 x 12 Gold Sugar Coated card stock. The Happy Birthday elements at the top are from the Lots o’ Luck Odds & Ends collection and the rainbow, clouds, and unicorns at the bottom are from the Icons Sticker sheet. I added some card stock on the back of them and popped everything up on foam for dimension. I added a matching Rainbow Hearts Shape Sprinkle to each of the letters in “Happy” to finish off.


For my third card I started with a white card stock base and covered the entire front with So Charming double-sided paper from the 6 x 6 Lots o’ Luck Paper Pad. Then I again sponged some aqua ink on more white card stock and added some Green Grass Washi Tape across the bottom to ground the scene. Next I built the scene with die cuts from the Odds & Ends Collection and a couple of Icons Mini Stickers, then finished off with some Gold Sprinkles.


And that’s it from me—I hope you got some inspiration for using this collection from my cards today. Thanks so much for stopping by!


Doodlebug Design:
Lots o’ Luck 6 x 6 Paper Pad
Lots o’ Luck Odds & Ends
Lots o’ Luck Mini Icon Stickers
Lots o’ Luck Icons Stickers
12 x 12 Gold Sugar Coated card stock
Gold Sprinkles
Tuxedo Strip Washi Tape
Green Grass Washi Tape
Rainbow Hearts Shape Sprinkles

Other:
White card stock
Aqua dye ink
Mini Ink Blending Tool


Thursday, February 21, 2019

MFT February Birthday Project Challenge - You’re HOW Old?


Sometimes using a numerical representation of the birthday boy or girl’s age is to share in their excitement (four-year-olds LOVE being four!) and sometimes, it’s maybe to rub it in a bit…in a loving way, of course. This month, we're challenging you to come up with interesting ways to feature numbers in your designs — whether recognizing the milestone of a newly-christened teenager, the celebration of hitting the half-century mark, or anything in between (or beyond!) we want to see numbers in play.


OK, peeps, I have to say I am so freakin’ pleased with this card I can hardly stand it, LOL! It turned out pretty much like I had in my head and I’m in my head it was awesome, LOL! So, let me tell you how I did it. I started by doing the background with Mini Cloud Edges Stencil and Berrylicious dye ink on Sweet Tooth card stock. Then I cut my Essential Speech Bubbles and using them and the bird stamps, laid out how I was going to arrange everything and marked where I needed to draw my light wires. Two of the speech bubbles had to be elongated to make it work with them going in the right direction. After I got the layout figured out and drew my lines with a Copic multiliner pen I stamped the birds from Tweethearts Stamp Set, cut them out with the coordinating Die-namics, and colored them with Copic markers, The sentiments on the speech bubbles are from All About You Stamp Set.


OK, so next I stamped the “…again?” element using Mini Well-Connected Alphabet Stamp Set and the sentiment from Sassy Pants Birthday Greeting Stamp Set. Then I arranged the birds and speech bubbles and adhered them with foam tape. I cut the numbers from LLD Little Numbers Die-namics from Electric Red card stock, adhered them to the appropriate speech bubble and finished off with a little heart cut with Tag Builder Blueprints 6.

And that’s it from me today! Thanks so much for stopping by! Be sure to stop by the
MFT Challenge Blog to see more inspiration and to play along for a chance to win a $50 gift voucher from MFT Stamps!


All products from My Favorite Things unless otherwise noted.

Stamps: All About You, Tweethearts, Mini Well-Connected Alphabet, Sassy Pants Birthday Greetings
Die-namics: Tweetheart, LLD Little Numbers, Essential Speech Bubbles, Tag Builder Blueprints 6
Stencils: Mini Cloud Edges
Dye Ink: Berrylicious
Hybrid Ink: Extreme Black
MFT Card Stock: Sweet Tooth, Electric Red, No Line Coloring
Supplies: foam mounting tape
Tools: Smart Grid Paper Pad, Mini MISTI, Mini MISTI Grid Paper Pad, MISTI Bar Magnets, Square Bone Folder, Scor-Buddy, craft tweezers

Other: Die-cutting machine, paper cutter, Copic markers, tape runner, QuickStik Pick-up Tool, Sakura White Gelly Roll Pen, sponge daubers, plastic eraser, Black Copic Multiline, small stamping block

Wednesday, February 20, 2019

Congratulations–MFT Wednesday Sketch Challenge #425


Hi, everyone, I’m back with this week’s MFT Wednesday Sketch Challenge! Are you ready? Here’s this week’s sketch. All of the details about the sketch challenge are available on the MFT Challenge & Inspiration blog as well as in the weekly newsletter. The MFT Design Team will be on hand to provide plenty of inspiration to get you started.


I thought Our Town Die-namics would be a great way to treat the horizontal element so I began by added a piece of sky that I had in my stash, done with Mini Cloud Edges Stencil and Berrylicious dye ink. I actually had this strip of Our Town cut from Ranger Watercolor paper also in my stash so win-win!! I watercolored the houses in bright colors and added some trees and clouds from Spring Scene Builder Die-namics, then popped it up on the card front with foam tape when it was dry.


To finish off I heat embossed a sentiment from Essential Sentiments on Black Licorice card stock and popped it up on foam, as well. I thought this would make a nice and colorful “new home” card.

And there you have it! Remember, you can get all the details by visiting the MFT Challenge Blog. You have the chance to win a $50 in MFT voucher. One winner is chosen at random each week!

Thanks for stopping by! See you soon!


All products from My Favorite Things unless otherwise noted.

Stamps: Essential Sentiments
Die-namics: Our Town, Spring Scene Builder
Stencils: Mini Cloud Edges
Dye Ink: Berrylicious
MFT Card Stock: Sweet Tooth, Black Licorice
Supplies: foam mounting tape
Tools: Smart Grid Paper Pad, Mini MISTI, Mini MISTI Grid Paper Pad, MISTI Bar Magnets, Square Bone Folder, Scor-Buddy, craft tweezers

Other: Die-cutting machine, paper cutter, Ranger Watercolor paper, tape runner, white detail embossing powder, Multi Medium Matte Glue, QuickStik Pick-up Tool, Precision Tip Glue Applicator Bottle, Embossing Magic, water brush, plastic eraser, sponge daubers


Deepest Sympathy–Color Throwdown Challenge #531


Hey everyone! It’s time for a new
Color Throwdown Challenge! This week Amy Rysavy is our hostess and she’s chosen some colors from this gorgeous inspiration piece for us to play with.


I thought those rich colors would make a great early evening sky—one perfect for a sympathy card. We hate having to made these but it’s always good to have one on hand, right? So, I sponged the background using Orange Zest and Boysenberry dye inks on Strathmore Bristol Smooth paper, then splattered some Copic Opaque White for the stars. When that was dry I adhered it to a Sweet Tooth card stock base. Then I added a distant snowbank cut from Cement Gray card stock and set it aside.


Then I cut Birch Trees Die-namics from Sweet Tooth card stock and added strips of Cement Gray card stock behind them. I added them to the card front, some popped up on foam tape and the foreground snowbank on which I stamped the sentiment from Deepest Sympathy Stamp Set with Cement Gray dye ink.

And that’s it from me! Remember, you do not have to have the exact colors to play the Color Throwdown challenge. If you don't, just use the closest you have. So, c'mon over to the Color Throwdown blog and play along with us this week. Please use the link service to post your card and please link directly to your card so we can find it easily. And please include a link in your post to the Color Throwdown. If you upload your card to a public forum, please use the keyword CTD531 so we can see your beauty all in one place, and use #ctd531 and #colorthrowdown on social media. Hope to see you there! Be sure to check out what the other team members have come up with this week, along with our super talented Guest Designer, Leigh O’Brien!

Amy Rohl
Amy Rysavy
Barbara Anders
(<—You are here!)
Broni Holcombe
Jodi Collins
Lisa Henke
Lori Tecler
Lynn Put
Vickie Zimmer
Wanda Cullen
Leigh O’Brien – February Guest Designer

Thanks so much for stopping by today! See you soon!


All products from My Favorite Things unless otherwise noted.

Stamps: Deepest Sympathy
Die-namics: Birch Trees, Stitched Snow Drifts
Dye Ink: Boysenberry, Orange Zest, Cement Gray
MFT Card Stock: Sweet Tooth, Cement Gray
Supplies: foam mounting tape
Tools: Smart Grid Paper Pad, Mini MISTI, Mini MISTI Grid Paper Pad, MISTI Bar Magnets, Square Bone Folder, Scor-Buddy, craft tweezers, Mini Ink Blending Tool

Other: Die-cutting machine, paper cutter, Strathmore Bristol Smooth paper, tape runner, Multi Medium Matte Glue, QuickStik Pick-up Tool, Precision Tip Glue Applicator Bottle, plastic eraser, Copic Opaque White, small art brush

Thursday, February 14, 2019

Sending You All the Love in My Heart–MFT Color Challenge #111


Hi, all, I'm back with the latest MFT Color Challenge! Are you ready? Here’s this week’s color combo: Sweet Tooth, Gravel Gray, Red Hot, and Electric Red. All of the details about the color challenge are available on the MFT Challenge & Inspiration blog as well as in the weekly newsletter. The MFT Design Team will be on hand to provide plenty of inspiration to get you started.


Well, I *had* to do one more Valentine for Valentine’s DAY, didn’t I? I decided to make a shaker card using Entwined Hearts Die-namics and I started by stamping Romantic Script Background on my Sweet Tooth card stock card base with Gravel Gray dye ink. Next I cut my Sweet Tooth card stock card front with Entwined Hearts Die-namics and also a piece of Red Hot card stock. I removed the white and inserted the red in place and backed it with some clear acetate which held in in place and became my shaker window at the same time.


Then I created the shaker using foam tape, 6mm and 4mm Raspberry sequins—they fulfill the Electric Red requirement—Silver Shimmer seed beads, and some Pewter seed beads that are no longer available. I backed that with more clear acetate. This is the best way I’ve found to add an element to a card base and make sure it’s straight. Otherwise you have to put the upside down card base on top of the back of the shaker element and it’s impossible for me to get it straight! After that was done I heat embossed a sentiment from I Heart Celebrating Stamp set on Heavyweight Translucent Vellum cut with Slanted Sentiment Strips Die-namics to finish.

And there you have it! Remember, you can get all the details by visiting the
MFT Challenge Blog. You have the chance to win a $50 in MFT voucher. One winner is chosen at random each week!

Thanks for stopping by! See you soon!


All products from My Favorite Things unless otherwise noted.

Stamps: I Heart Celebrating, Romantic Script Background
Die-namics: Entwined Hearts, Slanted Sentiment Strips
Dye Ink: Gravel Gray
MFT Card Stock: Sweet Tooth, Red Hot
Specialty Papers: Heavyweight Translucent Vellum
Supplies: foam mounting tape, 6mm & 4mm Raspberry sequins, Silver Shimmer Seed Beads
Tools: Smart Grid Paper Pad, Mini MISTI, Mini MISTI Grid Paper Pad, MISTI Bar Magnets, Square Bone Folder, Scor-Buddy, craft tweezers, 1/8” Scor-Tape

Other: Die-cutting machine, paper cutter, Pewter seed beads, clear acetate card stock, tape runner, white detail embossing powder, Multi Medium Matte Glue, QuickStik Pick-up Tool, Precision Tip Glue Applicator Bottle, Embossing Magic, Sakura White Gelly Roll Pen, Mini Mister, water brush, sponge daubers, plastic eraser, clear foam, heat tool


LinkWithin

Related Posts Plugin for WordPress, Blogger...