Showing posts with label Chibi Lights. Show all posts

Thursday, February 15, 2018

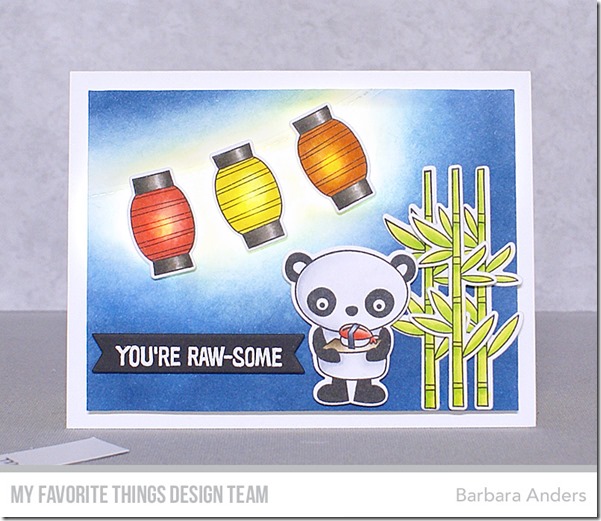
You’re Raw-some–Chibi Lights Event

chibilights_2018feb15

Hello everyone, today is the first day of a two-day Chibi Lights collaboration. Chibi Lights are so much fun so be sure to check out all the Design Team projects at the MFT Blog, along with all the details about an awesome giveaway. Be sure to check out the Chibitronics blog, too, as they are giving away a prize as well. 


Print


I have actually had this card in mind since this set was released and just never got around to doing it. In fact, I’ve had the lanterns colored for that long! To begin is this card, I sponged my background on Smooth White card stock, leaving an area lighter for the lanterns and embossed the “line” for it from Be Mine Banner. I marked where my lanterns were going to go and punched holes in the center area for each.

On my Sweet Tooth card base I arranged my circuitry in a parallel pattern since I had multiple lights—instructions for this pattern are in the Chibi Lights starter kit.

Here’s a little video showing the lights going on and off:


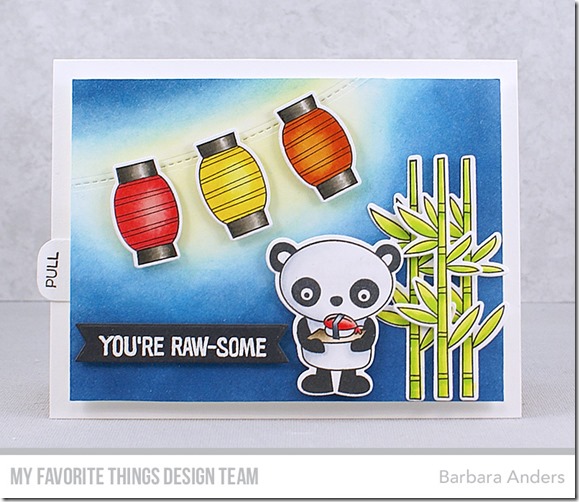
To create the “switch” I cut a piece of Sweet Tooth card stock to slip under the battery to break the circuit and turn the lights off. When I remove the paper, the connection resumes and the lights come on :) I stamped “PULL” from Interactive Labels Stamp Set on the slip of paper to let the recipient know what to do to light up the card. I used Chibi Conductive Fabric Tape Patches to protect the connection from the switch paper sliding in and out. Love these things!!

chibilights_2018feb15b

After I got my lights set up I popped the card front up on foam tape—it takes a couple of layers to match the thickness of the battery—and stamped and colored my images. I added them and the sentiment and it was done!

Chibi Lights are so much fun—there are several new products that are in my shopping cart right now that I am looking forward to using soon.

Thanks so much for stopping by! See you soon!


1newsupplies_thumb[1]

All products from My Favorite Things unless otherwise noted.

Stamps: Sushi Date, Interactive Labels
Die-namics: Sushi Date, Essential Fishtail Sentiment Strips, Be Mine Banner
Dye Ink: Banana Split, Cornflower, Blueberry, After Midnight
Hybrid Ink: Extreme Black
Specialty Inks: Versamark, Sweet Tooth Pigment Ink
MFT Card Stock: Sweet Tooth, Smooth white, Black Licorice, No-Line Coloring
Supplies: foam mounting tape, white detail embossing powder, Multi Medium Matte Glue, Chibi Lights Starter Kit, White LED Chibi Circuit Stickers Mega Pack, Chibi Conductive Fabric Tape Patches
Tools: Smart Grid Paper Pad, MISTI, Square Bone Folder, Scor-Buddy, QuickStik Pick-up Tool, Precision Tip Glue Applicator Bottle, Embossing Magic, Copics, craft tweezers, Mini Ink Blending Tool
Other: heat tool

1newsignature_thumb[1]

Saturday, December 03, 2016

MFT December Release Countdown, Day Four

countdownday4a_2016dec3


Hi everyone! Welcome to Day Four of MFT’s December Release Countdown! Today we’re previewing BB Our Story Stamp Set, BB Our Story Die-namics, Wavy Coloring Book Background, Stitched Triple Peek-a-Boo Window & Edge Die-namics, Star Grid Cover-Up Die-namics, and Star Grid Stencil. Be sure to check by the MFT Blog for all of today’s details and remember that release is on December 6th at 9pm EST.


NewReleaseCountdown_Day4

I have a couple of cards for you today starting with this adorable set from Birdie BrownBB Our Story and BB Our Story Die-namics. I decided to make this an interactive card—that lamp was just begging me to light it up so I did just that with my Chibi Lights. I started with a Sweet Tooth card stock base, then on Smooth White card stock I sponged my background with Berrylicious dye ink, Kraft dye ink, and a Mini Ink Blending Tool. I stamped the sentiment and set it aside. Then I stamped the images I wanted to use with Black Licorice hybrid ink on X-Press It Blending Card, cut them out with the coordinating dies, and colored them with Copic markers.

countdownday4a_2016dec3b


I created my Chibi Lights circuit on the card base by creating a simple paper switch which is located under the little side table. The battery is just under the word “BOOKWORM” and the light is, of course, under the lamp shade. I cut a small hole in the card front and popped the light up on one layer of foam mounting tape (it takes two layers of foam between the card base and card front to clear the battery) within the hole, and popped the lamp up on foam to cover the hole. Then I added all the other elements, also popped up on foam for added dimension.

countdownday4a_2016dec3c


To turn the light on you simply press on the table which activates the switch—so cool! If I were going to mail this I’d insert a piece of card stock to keep the circuit from making contact and the recipient would pull the card stock out to activate the switch.
*****

My second card is a little simpler starring the new
Wavy Coloring Book Background and Stitched Triple Peek-a-Boo Window & Edge Die-namics with an oldie but goodie set as a supporting actor ;-)

countdownday4b_2016dec3


This card also started with a Sweet Tooth card stock base. Then I stamped the background with Versamark on the smooth side of Ranger Watercolor Paper (smooth side because this background is so intricate and I wanted it all to show) and heat embossed with white detail embossing powder. Next I did a watercolor wash with Peerless Watercolors and adhered it to the card base after it dried, then I cut Stitched Triple Peek-a-Boo Window & Edge Die-namics from Sweet Tooth card stock and popped it up on foam mounting tape.

countdownday4b_2016dec3b


I stamped some fun images from Soak Up the Fun on X-Press It Blending Card with Black Licorice hybrid ink, cut them out with the coordinating dies, colored with Copic markers, and popped them up on foam within the window openings. I then stamped the sentiment with Versamark on Black Licorice card stock cut with Stitched Sentiment Strips Die-namics and popped it up on foam as well. I finished off with some Pretty Pink Posh sequins.

And that’s it for Day Four of
MFT’s Release Countdown! Thanks so much for stopping by! See you back tomorrow for Day Three!


1newsupplies
countdownday4a_2016dec3


countdownday4b_2016dec3


~Supplies~
Interactive Card:
Stamps:
BB Our Story (MFT)
Ink:
Black Licorice hybrid ink, Berrylicious dye ink, Kraft dye ink (MFT)
Paper:
Sweet Tooth card stock, Smooth White card stock, X-Press It Blending Card (MFT)
Accessories/tools: Vagabond;
BB Our Story Die-namics, foam mounting tape, Chibi Lights, Mini Ink Blending Tool, MISTI (MFT); Copic markers

Wavy Background Card:
Stamps:
Wavy Coloring Book Background, Soak Up the Fun (MFT)
Ink:
Black Licorice hybrid ink, Versamark (MFT)
Paper:
Sweet Tooth card stock, Black Licorice card stock, Ranger Watercolor Paper, X-Press It Blending Card (MFT)
Accessories/tools: Vagabond;
Stitched Triple Peek-a-Boo Window & Edge Die-namics, Soak Up the Fun Die-namics, Tag Builder Blueprints 4 Die-namics, foam mounting tape, Peerless Watercolors, waterbrush, white detail embossing powder, Embossing Magic, Pretty Pink Posh sequins, MISTI (MFT); Copic markers, heat tool

1newsignature

Friday, August 19, 2016

MFT & Chibi Lights Collaboration

Print

Hi, everyone, welcome to another day of MFT/Chibitronics collaboration! MFT is stocking a super fun kit that has everything you need to create light-up projects and today several of the Design Team will be showing you what we did with the lights. Be sure to check out the MFT Blog for all the details.


chibicollage

For my project I chose to make the stars shine by using LLD Count the Stars Stamp Set, LLD Stars & Wishes Die-namics, and LLD Lucky Stars Die-namics.


chibicolab_2016aug19

I love this sentiment from LLD Count the Stars Stamp Set so I created my design around it.


chibisarsmarked


I started with a
Sweet Tooth card stock base. Next I cut some stars out of Ranger Watercolor Paper with Blueprints 8 Die-namics and Blueprints 13 Die-namics and created my background by stamping Tiny Stars Background with Versamark on Ranger Watercolor Paper and heat embossed with white detail embossing powder. Tip: do any die cutting first, because sometimes heat embossing can get damaged with the rollers during the die cutting process. Next I traced the star layout onto my card base so I could line up the lights perfectly—this is where the circuitry will be placed. I applied a watercolor wash with Peerless Watercolors and a waterbrush and set the background aside to dry.


chibicircuit

Here’s how I arranged the circuitry. You can see that I started with the bottom star point and worked in a clockwise pattern to complete it. I created a pressure switch so the lights can be turned on and off—that’s why there‘s a break in the copper tape. Full instructions for doing this and many other configurations are in the booklet that comes in the kit.


chibicircuitdone

Here you see the pressure switch in place along with Translucent Vellum covering the star openings and foam mounting tape to pop up the rest of the background. I found I needed two thicknesses of foam mounting tape to equal the height of the battery.


chibicolab_2016aug19b

I added the sentiment from LLD Count the Stars Stamp Set on the front along with LLD Stars & Wishes Die-namics. A LLD Lucky Stars Die-namics is the trigger point for activating the switch. I shot this view in some darkness to show how bright the stars shine :)

And that’s it! I hope you’ll give the Chibitronics lights a try and show us what you come up with. Thanks for stopping by today—see you soon!


1newsupplies


~Supplies~
Stamps:
LLD Count the Stars Stamp Set, Tiny Stars Background (MFT)
Ink:
Versamark (MFT)
Paper:
Sweet Tooth card stock, Black Licorice card stock, Ranger Watercolor Paper, Silver Shine card stock (MFT)
Accessories/tools: Vagabond;
LLD Stars & Wishes Die-namics, Lucky Stars Die-namics, Blueprints 12 Die-namics, Blueprints 13 Die-namics, Blueprints 8 Die-namics, Peerless Watercolors, waterbrush, white detail embossing powder, Embossing Magic, foam mounting tape, Chibitronics (MFT); heat tool 

1newsignature